Hi all, I am new to dynamo, astonished about it’s possibilities but way too slow (for the moment) to be able to use it.
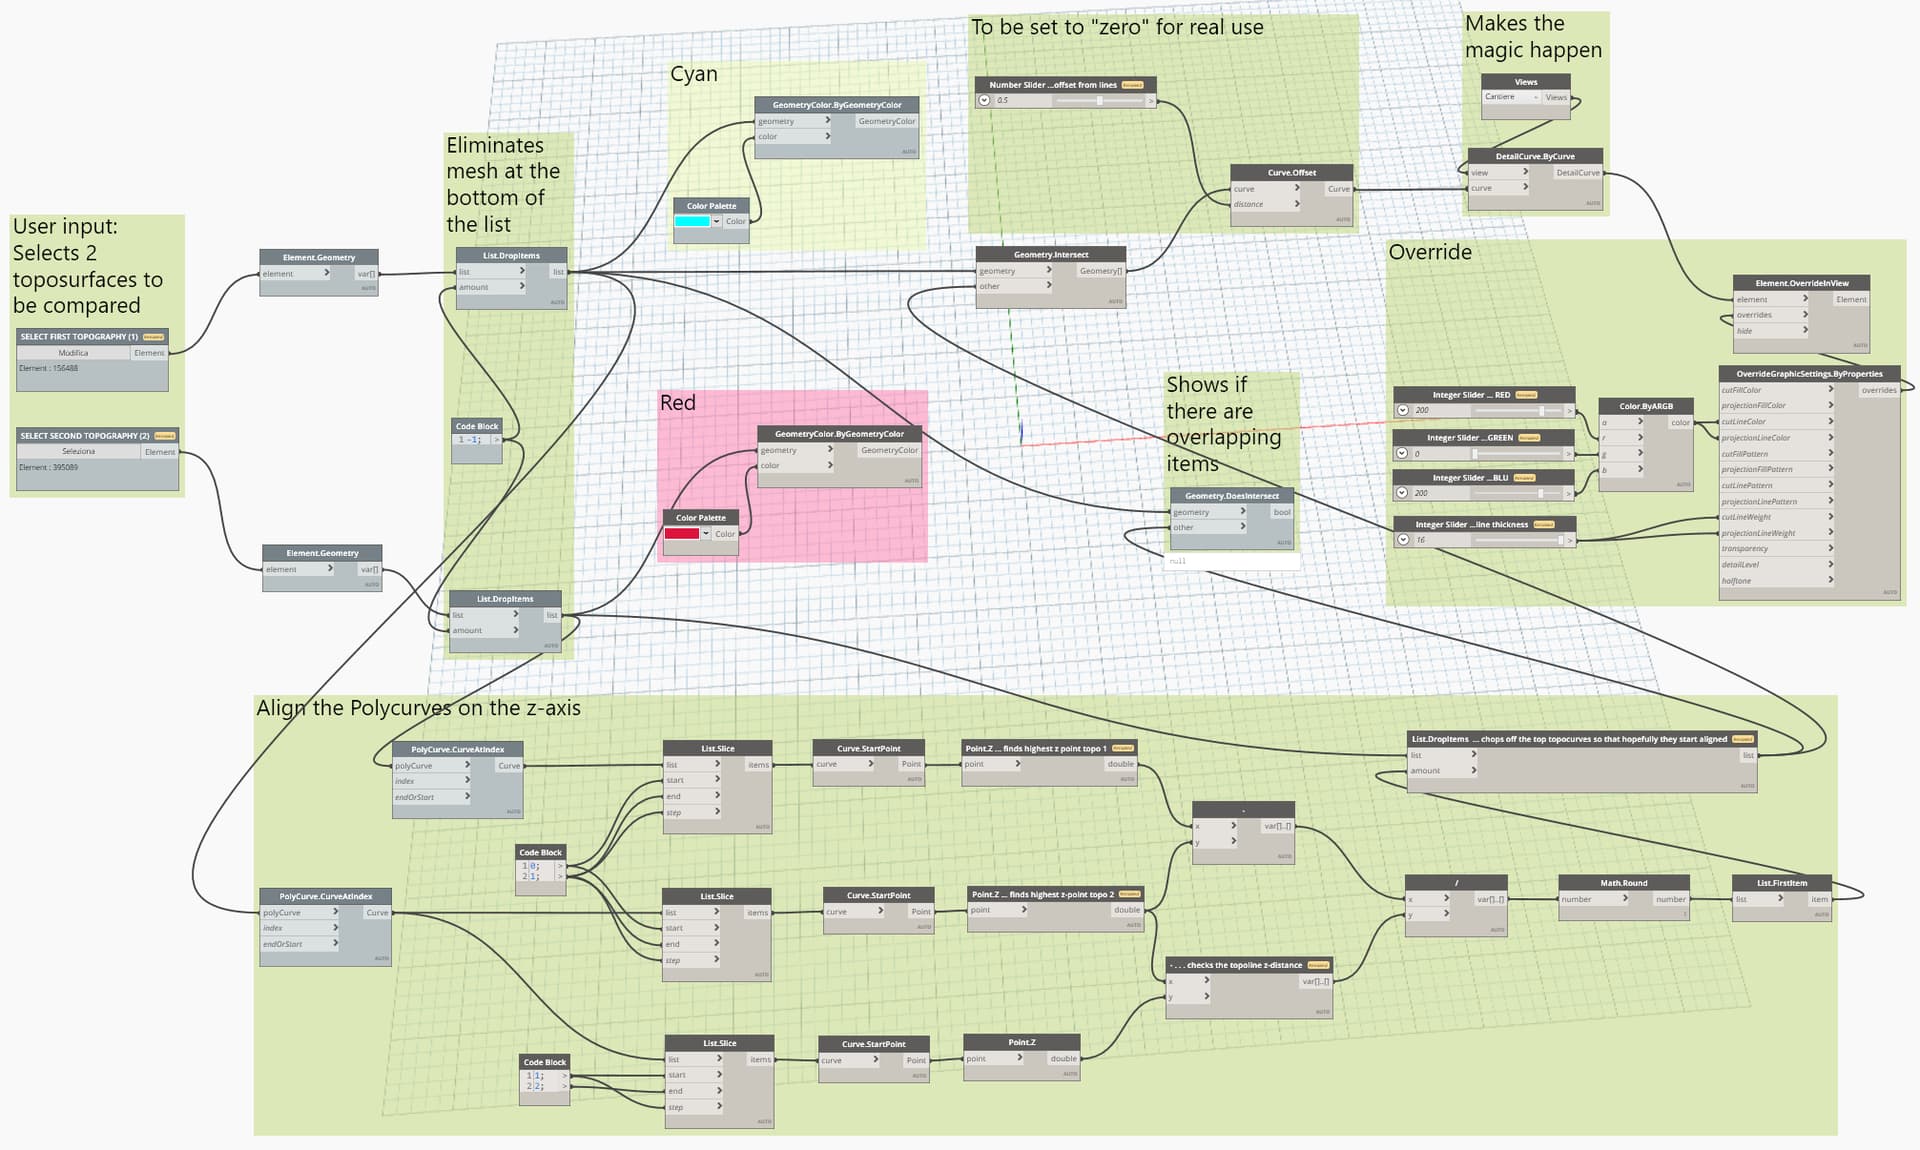
Is it possible to create a script that takes a plan view which contains a.o. two overlapping topographys, that then colours the matching(overlapping) isolines black and leaves the changed lines by the revit phase assigned colours ?
So you clearly see the unchanged area that remains black and the new contour lines for example yellow demolished and red built.
After a weekend i managed to find the overlapping lines but still long way to go ?
This is most likely possible, could you share what you have so far, what you’re struggling with and what your end goal is? Images always help in these scenarios.
Hi Daan, thks for your reply. Next week I will send what I have (little). The goal is:
When levelling a topo surface Revit makes a copy. In comparitive mode all the existing looks thus demolished and all the project (including unchanged areas) looks new.
For permits I need to evidence only the changed parts. Red=new Yellow=demolished Black=unchanged.
So on the floorplans, the overlapping unchanged lines must simply be coloured black.
And in section the unchanged part should have a black hatch. Basically a local “covering” that follows the lowest of both topolines in section.
I would like to built a script that obtains this by selecting plans and views.
I made some progress…I need to find a way to auto-align the toposurfaces on the z-axis and need to find out how to insert the result presentable on the revit drawing.
Mmmm, i am stuck . . . . . On a more complex topo survey it doesn’t work flawless.
If i l create a levelled region of the toposurface without making any changes the script works, if I shift some points horizontally (to be able to pick the surfaces), it works (strangly skipping only one line ?), if I move one on the z-axis the scripts blocks at the end of that curve ?
Strange behaviour, on the topo surface I need to use it, it worked. Now all of the sudden it gives me the following error: Polycurves maybe branching ?
The error message “PolyCurve may be branching” suggests that the curve you’re dealing with has a branch or split, like an Y-shape. In Dynamo a PolyCurve can’t branch or split, it is always a single line.
Could you maybe share, with some documentation, what the final version of your script is now and what the exact input and output is?
Tks for the help. The good point is that dynamo shows where it’s branching. So either I update the toposurface (there are only a few points) or I was experimenting to see what happens when I lower the topoline with 1 mm from 1,00 meter to 0,999 meter. The branching seems to disappear on Revit ! But Dynamo goes in trouble with some kind of curve tollerance error. So I tought that maybe I can roundoff the z points afterwards ? Kind a stuck with this and time is running out.
One of the random examples on which it works. After the script runs the unaltered part of the topolines are covered with black detail lines, easily selectable and filter sensitive tks to clockwork.
Attached the NOT working topography. On the outer part it works (despite the fact there are banching items on the new topo which are not reported ??). On the inner part it now shows crossing lines (mistakenly thought these were the branching items indicated by dynamo). On the new topo it does not gives an error message for the remaining branching items (circles) ?
I’ve revriewed the Dynamo file you send and I’ve decided to rewrite it from scratch. Some parts of the code didn’t really made sense and other parts didn’t work at all on my end. I’ve based the Python Code, originally written by @Ewan_Opie, from another forum post which discussed removing duplicate curves. In your case we want to specifically keep duplicates
import sys
import clr
clr.AddReference('ProtoGeometry')
from Autodesk.DesignScript.Geometry import *

## For getting duplicate Curves
def getDuplicateLines(curves):
    C0 = []
    C1 = []
    duplicates = []
    for c in curves:
        if str(c) in C1 or str(Line.Reverse(c)) in C1:
            duplicates.append(c)
        else:
            C0.append(c)
            C1.append(str(c))
    return duplicates

OUT = getDuplicateLines(IN[0])
Hi Daan, first of all tks a 1000. For some reason however your script does not work on my setup? First it doesn’t let me select the toposurfaces. Tried all corners and points on the surfaces. Thus tried to change the first item from “topography - contour line” to just “topography”. I then can select the topo’s, but the outcome is blank ?? Do I need to install some package on top of the standard out of the box dynamo ? (revit 2022, dynamo 2.10.1) ? Your python shows CPython3 on the bottom right of the script.
It should be topography, better yet use the “Select Model Element” node instead of the one with the Category built into it, it didn’t really work for me either, kept changing the category.
No, you don’t need to install anything since I didn’t use any Dynamo/Python Packages.
I’ve tested it with my Revit 2022 installation, which has the latest hotfix 2022.1.3 and thus Dynamo 2.12.1. For me it seems to work just fine. Whilst testing i found that there are 2 overlapping topographies, 1 in red and 1 in green. The red on has a hole in the middle but the green one doesn’t. Perhaps that’s why you aren’t getting any overlap?
I’ve made some small changes through, since it seemed that the duplicate filtering from the original lists at the end didn’t work in some cases:
Tried it on other topograhies. Running it in Revit I did not see the detail lines. Added “detailcurve.bycurve” and “clockwork” after your python script. Now it draws the overlapping lines in Revit.